How to Upgrade the RAM in your Synology DS423+ to 10GB and 18GB RAM Officially/Unofficially
The Synology DS423+ NAS is a NAS system that arrives with an impressive middle ground between Power, Efficiency and Price, thanks to that previously used Intel Celron J4125 CPU, as well as scaled back expandability and memory when compared to the DS923+ and DS920+ NAS Premium 4-Bay Diskstations. The DS423+ is one of the latest generation of Diskstation devices (in the 2022/2023 series), but seems to be targeting the home/SOHO/SMB user more than the more high business presentation of other recent releases by the brand. However, the system arrives with 2GB, but can be upgraded officially to a slightly unusual 6GB of RAM! The reason for this is that the initial 2GB of memory is soldered/fixed directly to the internal board as individual RAM modules, as opposed to arriving in a removable SODMM/RDIMM slot form. There is also an empty SODMM slot, which means that you can only install a 4GB official memory module in order to remain inside the official CPU maximum memory quantity – hence the 6GB maximum here.So, unsurprisingly, there are users that might want to upgrade that memory on Day 1 in order to remove any kind of potential bottleneck down the line (a VM/Container, modest Databases, lite-medium Surveillance environment, etc) or even just users that have set up the device to their own unique setup – but noticed that Memory usage is constantly hovering at the 60-70%. Synology NAS systems use quite proficient intelligent background memory use and flushing, but nevertheless, there are still plenty of users who want to scale up the base-level memory. In this article, I will show you how to upgrade the memory on your Synology DS423+ NAS, but also I will show several 3rd party (i.e Unofficial modules) that I have tested in this NAS.

Upgrading your Synology DS423+ with Unofficial Memory – Pay Attention
Before we continue with the guide, it is worth highlighting that the DS423+ manufacturer, Synology, strongly recommends that you do not exceed the stated memory limit on their specifications page. They also highlight that using non-official memory in your Synology DS423+ may well result in them being unable to provide technical support, as this would be an unsupported setup. We at NASCompares cannot be held accountable for how you use this guide. However, below I will show you where to buy the individual memory and Synology DS423+ NAS device you will need. ONLY attempt this upgrade if you are comfortable with the terms laid out above by the manufacturer. Finally, it is also worth remembering that just because a system can SEE more than the official maximum memory, there is no guarantee that you will be able to utilize the full visible memory at once. Synology’s recommendations on the maximum memory supported by their NAS systems are often governed by three factors:
- The Recommended Maximum Supported Memory detailed by the CPU Manufacturer (e.g. Intel or AMD), which can also be a case of lanes and bandwidth allocation/availability
- The number of memory slots that Synology add to the system. This can be a case of a NAS only having 2 slots (with only 32GB modules supported by the brand) but the CPU supporting more than that being a physical conflict
- The Synology NAS might arrive with fixed/soldered memory for it’s default memory (e.g. the 2GB in the DS423+ or 4GB in the DS920+) but might also have a free memory upgrade slot – this leads to unusual memory caps such as the 6GB Maximum on the DS423+, despite it’s CPU supporting upto 8GB.
If you choose to go ahead with unofficial memory, afterwards, it is highly recommended to test the full quantity available with VM testing (assigning bulk memory to each virtual image) and running at the same time to see if it is utilized.
Synology Official Memory vs Unofficial Memory from Crucial, Kingston, Sabrent, etc?
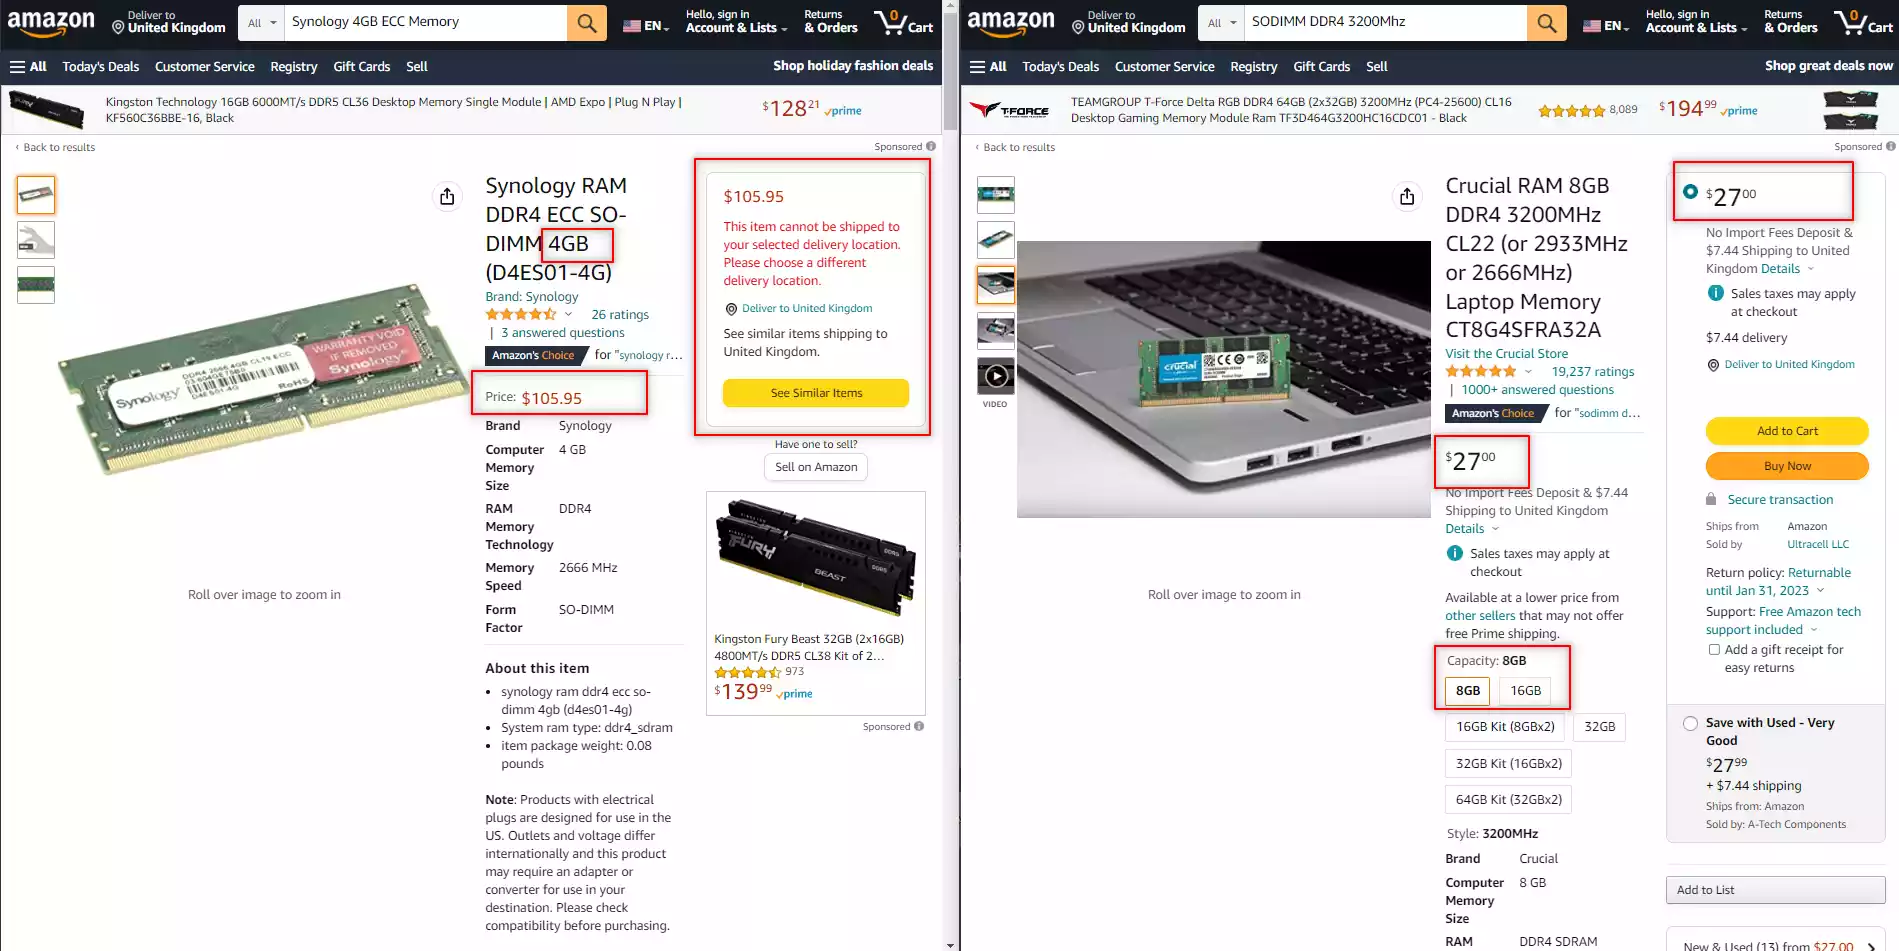
Luckily Synology provides a wide range of official memory upgrades that can be purchased from numerous retailers online, however, they are generally more expensive than the 3rd party equivalents (see example above). Now, there could be a few good reasons for this. Firstly, these memory sticks are first-party and specifically selected to work on the Synology NAS systems (taking alot of the searching out of it for people in researching speeds, frequencies and supported PIN numbers), and officially branded components for any hardware manufacturer are always pricier.
Next, they do not have the rotation of stock that Crucial or Kingston has and therefore, the flexibility in pricing they might have is not available. Lastly, the Synology memory will often be ECC memory (especially in recent released NAS systems by them, but not the DS423+ NAS) and ECC memory always commands a higher price. However, given this memory is likely manufactured by a 3rd party, that does make it a little painful sometimes for smaller Synology NAS users who look at official memory and its often 2-3x pricepoint of equivalent modules from Kingston, Crucial and Samsung. So, in this guide we talk about upgrading your memory with both official and unofficial memory, what happens when you do and if there are risks to factor in. If you are a little unsure about whether you need to use ECC memory in your specific Synology NAS setup, you can watch the video below detailing the pros, cons and more:
Synology DS423+ Official/Unofficial Memory Upgrade – Step 2, Physical Installation
What you will need:
- A Synology DS423+ NAS – Obviously
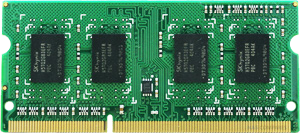
- 1x Memory Upgrade Modules (Ranging from 4GB to 8GB and 16GB Individual Modules – Link below for Tested RAM modules from Crucial, Kingston, Samsung, Timtec and Synology Official Memory too:
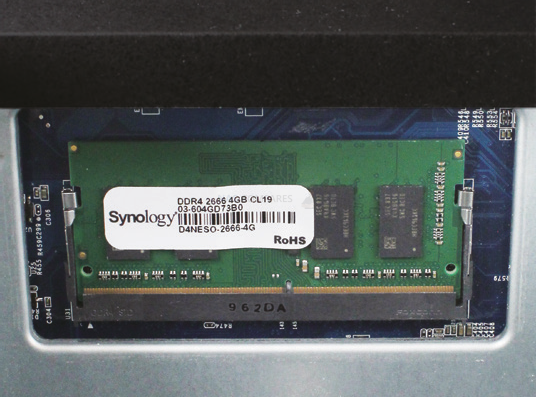
| DS423+ | DDR4-2666 non-ECC unbuffered SO-DIMM 260pin 1.2V | D4NESO-2666-4G
|
Crucial 4GB – Buy Here
TimeTec 4GB – Buy Here Kingston 4GB- Buy Here Crucial 8GB – Buy Here TimeTec 8GB – Buy Here Kingston 8GB- Buy Here Crucial 16GB – Buy Here TimeTec 16GB – Buy Here Kingston 16GB- Buy Here Crucial 32GB – DOES NOT WORK! |
- VERY IMPORTANT – The Links used in the article below towards the correct unofficial memory are occasionally changed (beyond my control) as it will direct you to the site in your own region/country. MAKE SURE to check that the memory module (especially 16GB SODIMM modules) are DUAL RANK or ‘DR‘, as Synology NAS typically have trouble with SR/SINGLE RANK modules.
![]()
- (OPTIONAL) Anti-static gloves and Envelope – useful to eliminate static charges and also to store the removed older official memory sticks):
 |
 |
First, we need to ensure the Synology DS423+ is completely powered down/off and the mains power has been disconnected. It is recommended that you remove the Hard Drive or SSD that you have installed before accessing the RAM as it may block the slots. Additionally, you should remove the hard drive media as the unit will be moved around a lot during the memory installation and this could damage the drives. Be sure to keep a note of the drives that you remove and the order they were installed (HDD Bay 1, HDD Bay 2, etc) as installing the drives in the wrong slots could damage any existing RAID you have setup internally.
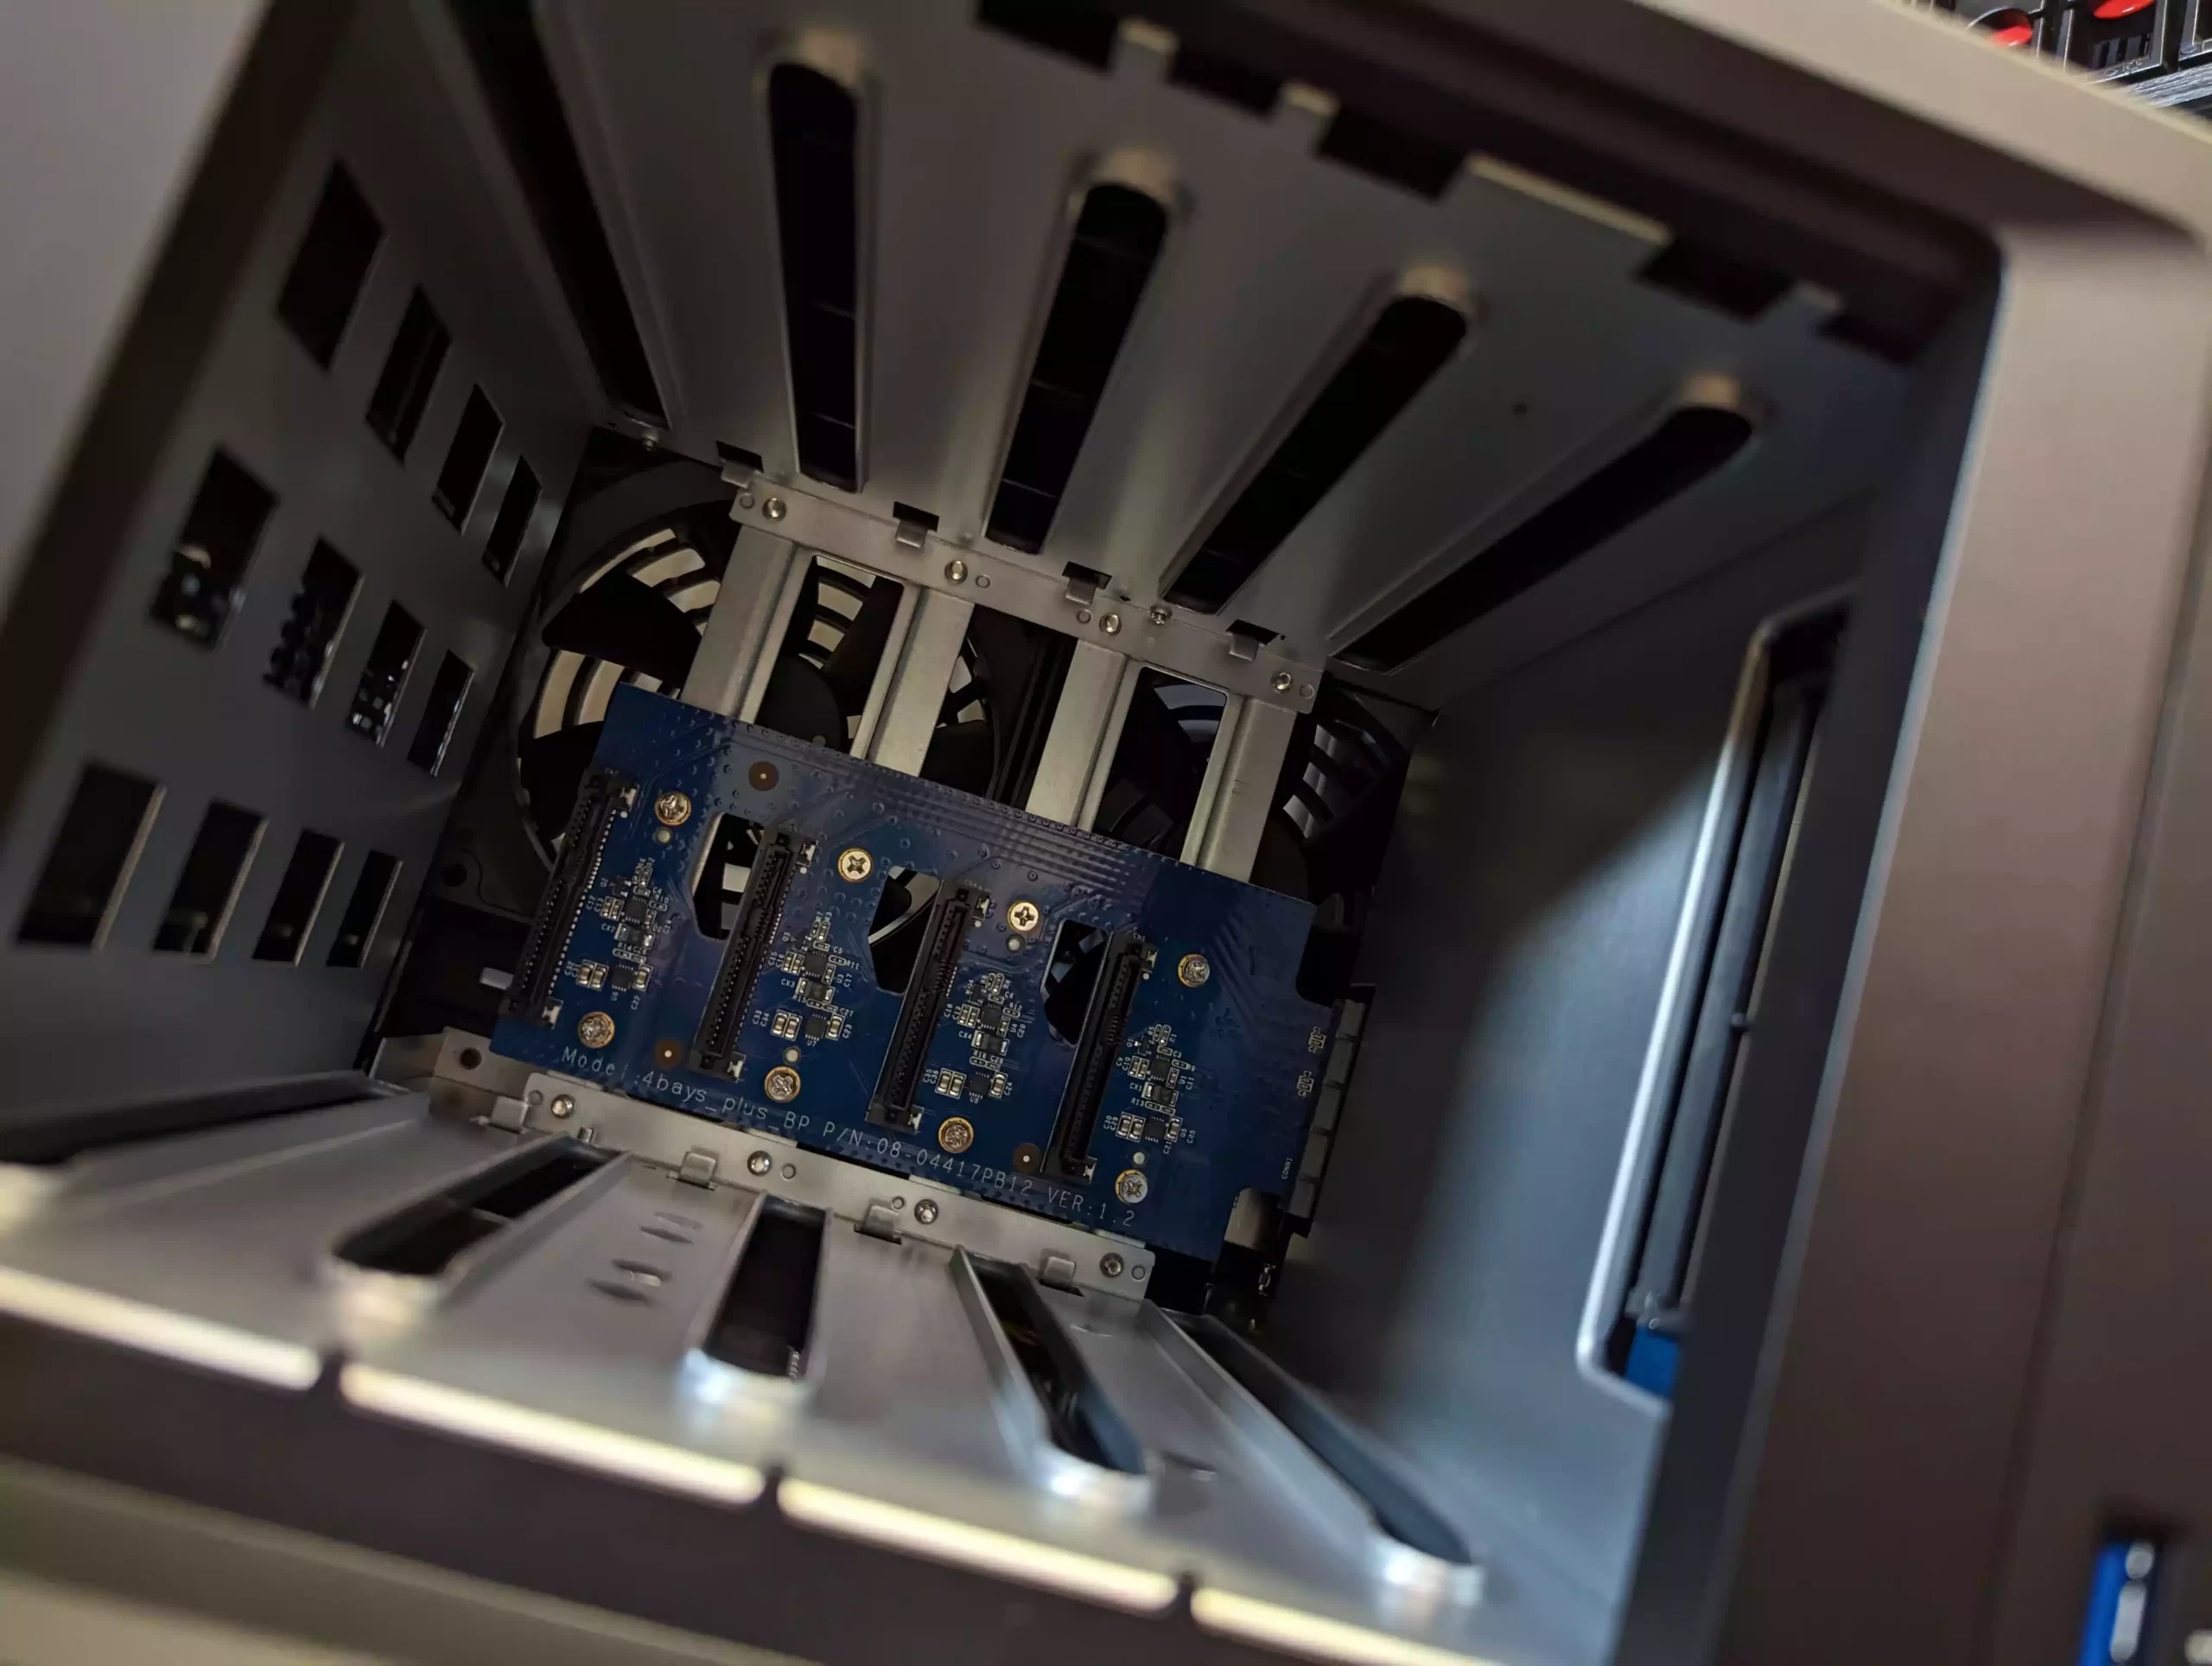
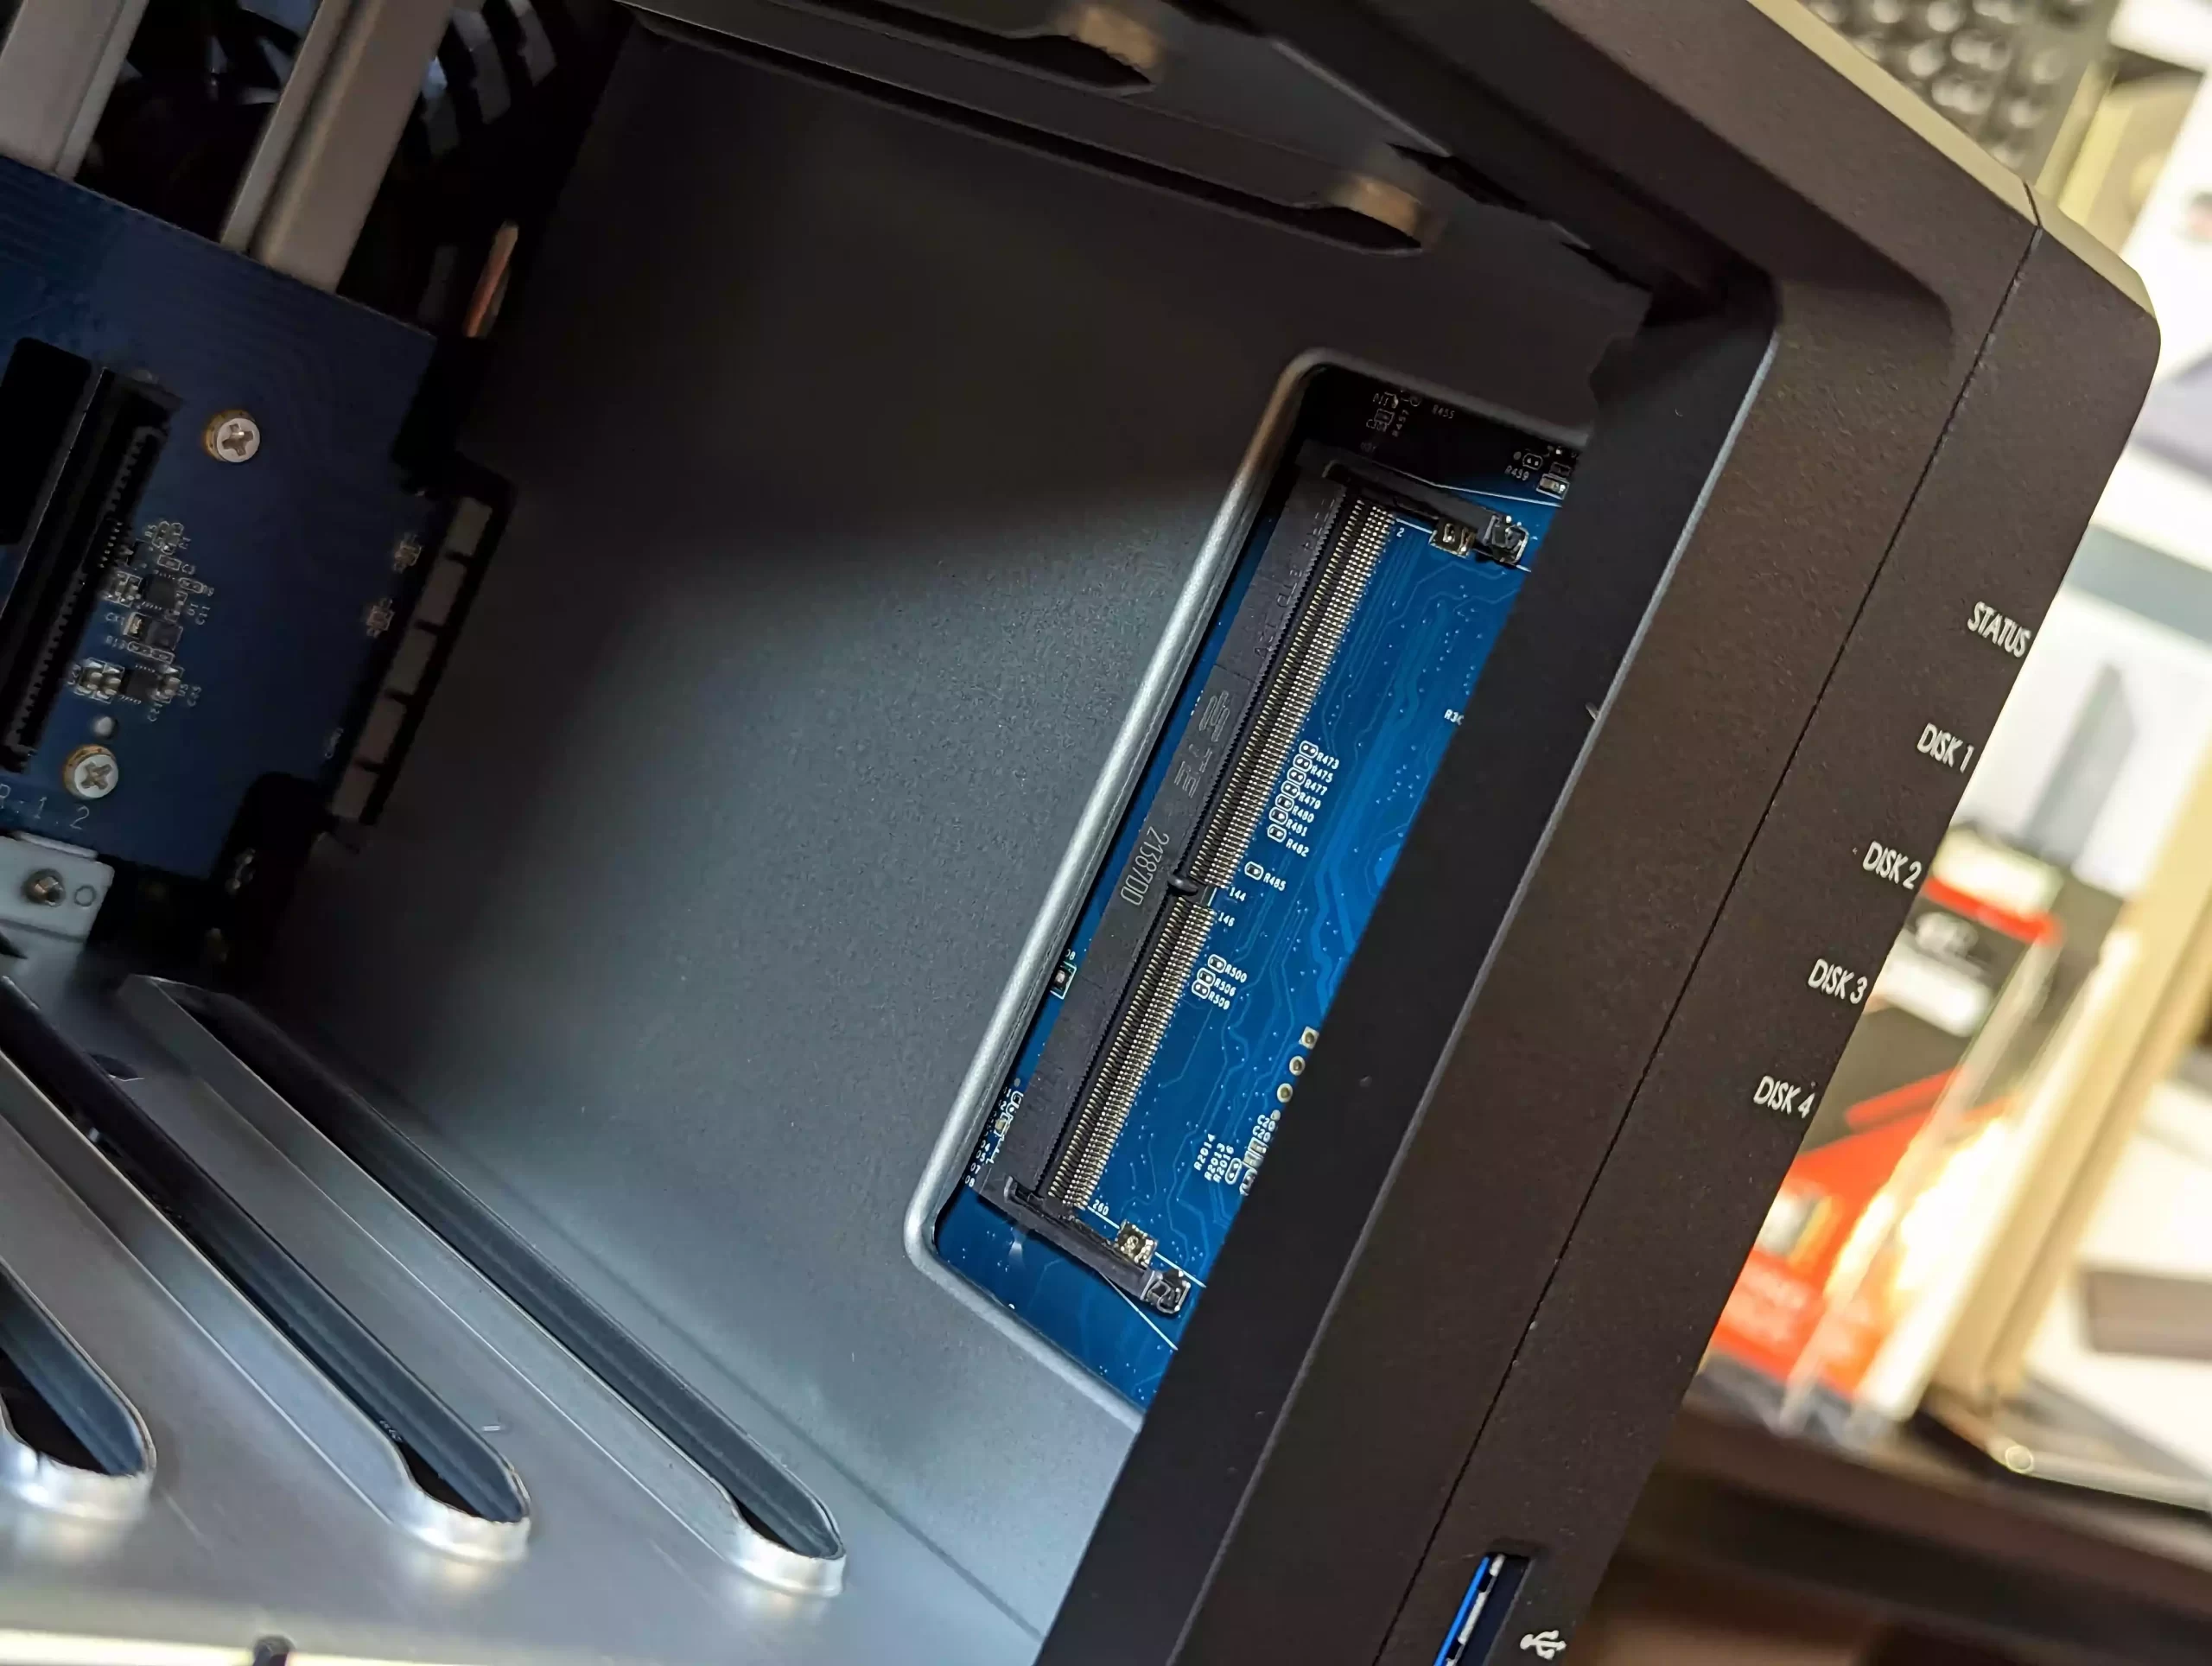
Next, we need to access the memory upgrade panel. Now, if you are just adding the existing memory, you can just add the additional module to the available SODIMM slot. However, if you are upgrading the system’s memory with a new module to replace an earlier upgrade you might have made (eg upgrading 4GB module with an 8GB or 16GB 3rd Party Module), you will need to remove the old memory (remember to store it in an antistatic bag afterwards). However, this step is not applicable to the DS423+ NAS and it’s default 2GB memory, which is pre-fixed to the main controller board internally.
If you are removing any existing memory you have in place (i.e from a previous upgrade), be sure you eject the official memory sticks using the clips on either side of the slot, as well as only holding the memory sticks by the narrow side edges, never touching the chips or board of the money or NAS.
Once you have removed any existing modules, they can either be stored away for a later project, installed in a compatible laptop or sold on eBay etc to make a little cash back! Though I would recommend holding on to any removed official memory, as you might well need it in the event of a warranty/support claim. Once they are clear, install your chosen unofficial DDR4 SODIMM memory modules in the available slot, making sure that you click them in with the clips on either side.
Synology DS423+ Official/Unofficial Memory Upgrade – Step 2, Checking the Unofficial Memory is Recognized
What you will need:
- A web browser (Chrome, Safari, Firefox, etc) on a Windows, Mac or Android Machine) accessing the Synology DS423+ user-interface as you normally would.
Next, you need to power up your Synology DS423+ NAS and access it as you normally would. If you are buying this NAS first time and have yet to set it up, there are numerous first-time set-up guides and tips on the YouTube channel here – that will get you from the hardware installation to set up the Synology DS423+ NAS for use. Once the NAS user interface (UI) is ready to go, head over to the hardware specification page shown here:
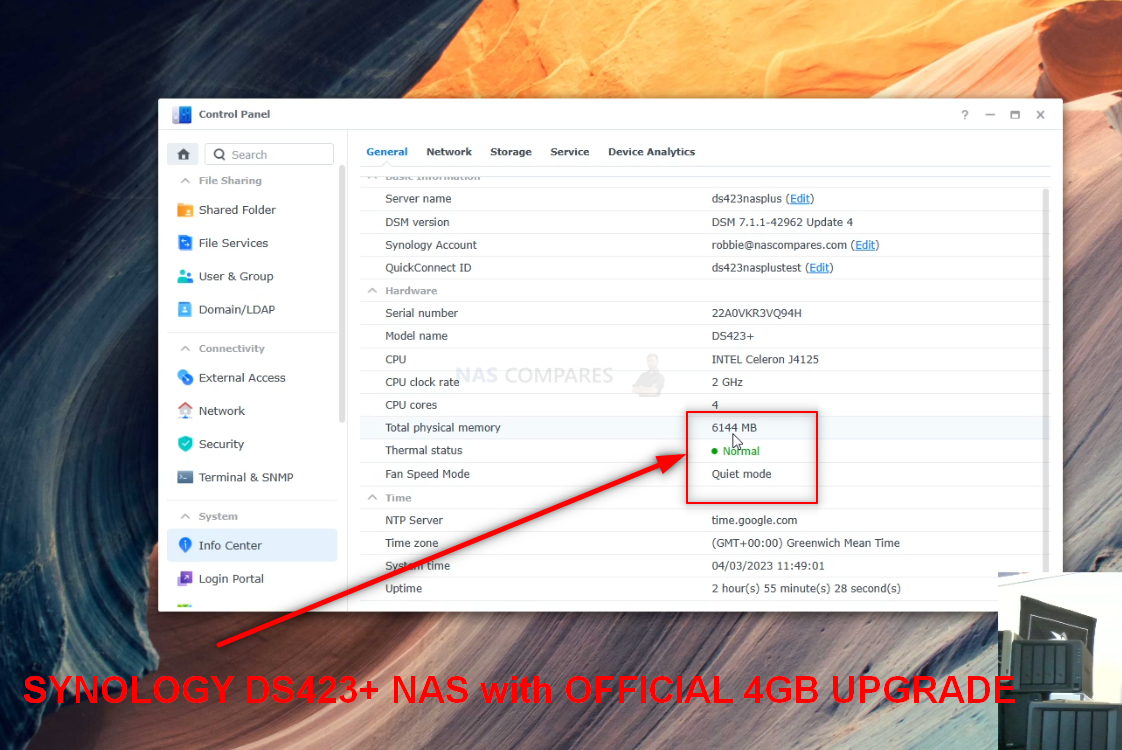
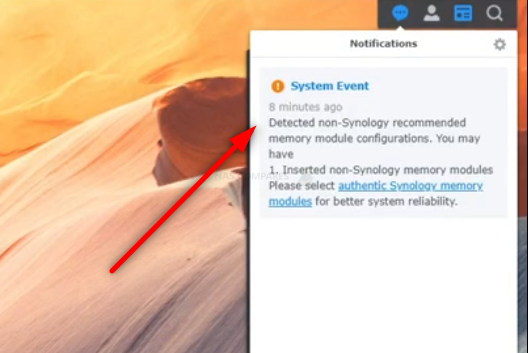
As you can see in the image above, the Synology has recognized the increased memory. It is still recommended to head to Step 4 below to see how to use the official memory test feature of the system.
Synology DS423+ Official/Unofficial Memory Upgrade – Step 3, Unofficial/Unsupported Memory Tested
As mentioned earlier, Synology is pretty clear about its position on users opting for non-Synology memory in their systems or exceeding the officially stated maximum capacity of the DS423+. They feel this is using the system in a configuration that is outside of the guaranteed performance and stability that they advertise. This means that if your system encounters issues as a result of these unsupported configurations, they (at best) will have difficulty recreating this configuration to provide support or (at worst) refuse to provide support as they have been pretty clear on the setups that they state the DS423+ can run with. However, there is no avoiding that there have been countless examples of Synology NAS systems functioning perfectly well with 3rd party memory (YouTube Playlist of Synology NAS 3rd Party memory Tests HERE), so here are some examples of memory modules we tested on the Synology DS423+ NAS (including model ID and links as needed – again, DOUBLE CHECK THE MODEL ID before you buy, as retailers will check page links):
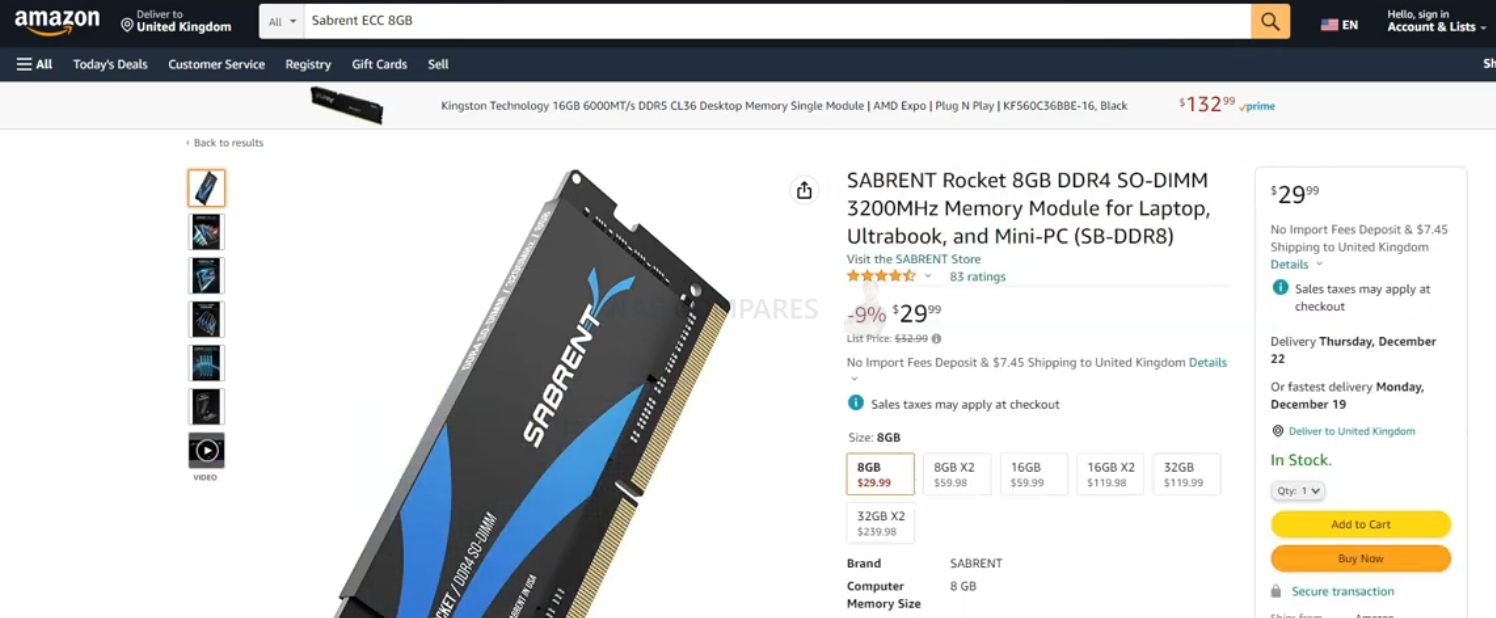
Synology DS423+ NAS + with 1x Sabrent Rocket 8GB 3200Mhz DDR4 SODIMM
Sabrent Memory 2x DDR4 SODIMM SB-DDR8 8GB HERE – (8/16/32GB Available):
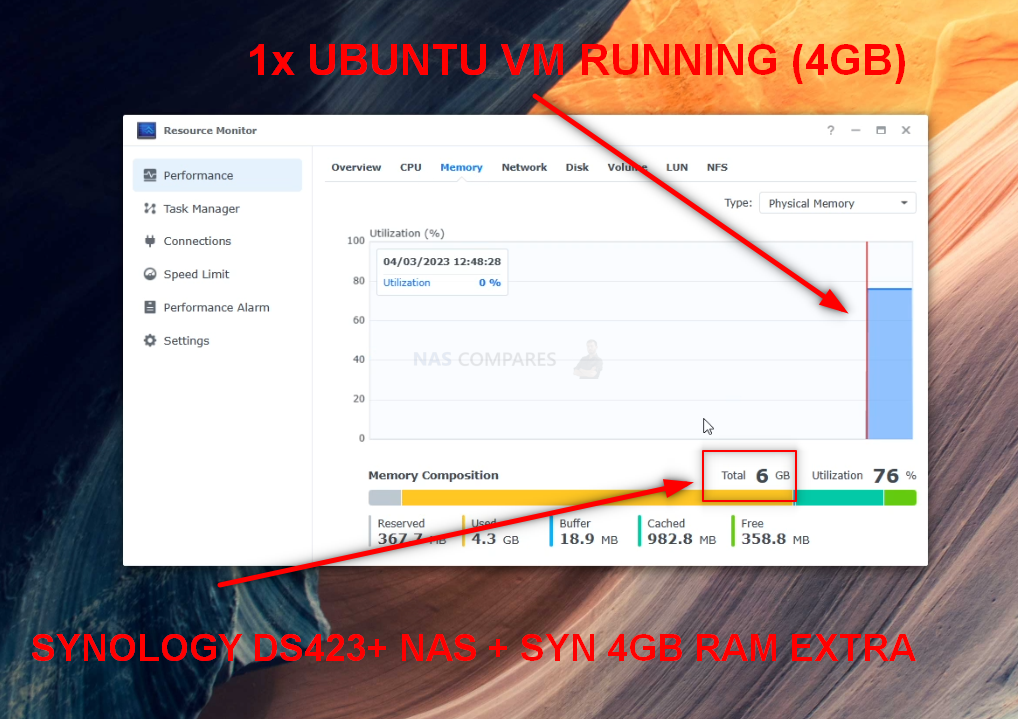
After installation, I checked the Synology Resource Monitor and the Sabrent memory was recognized:

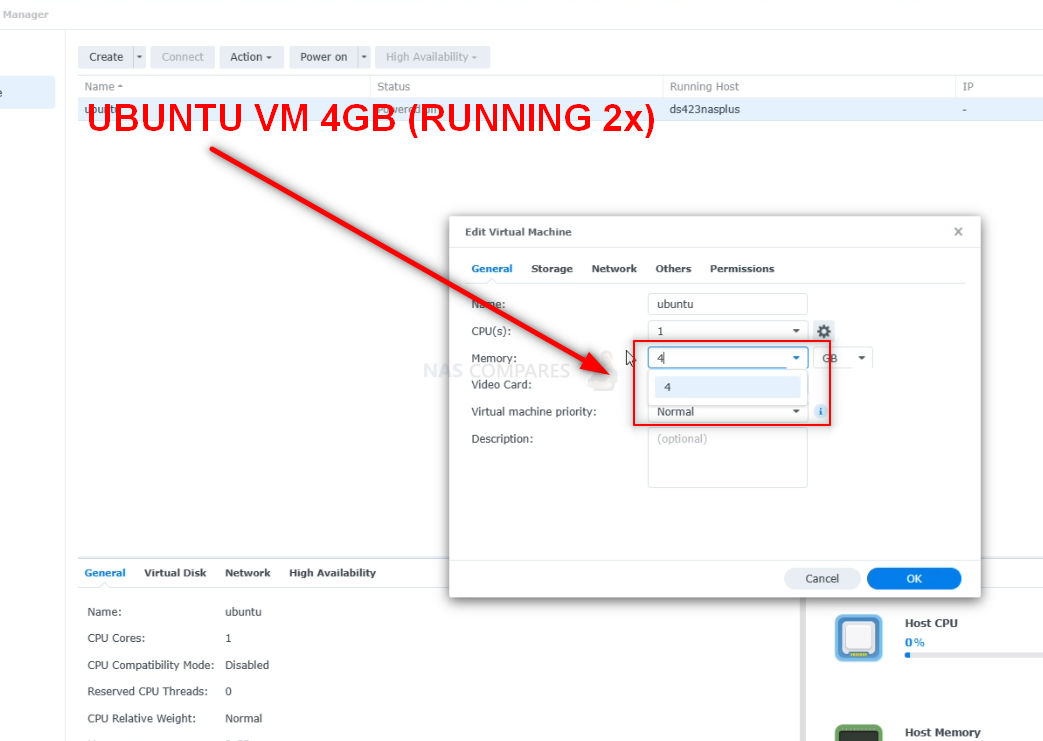
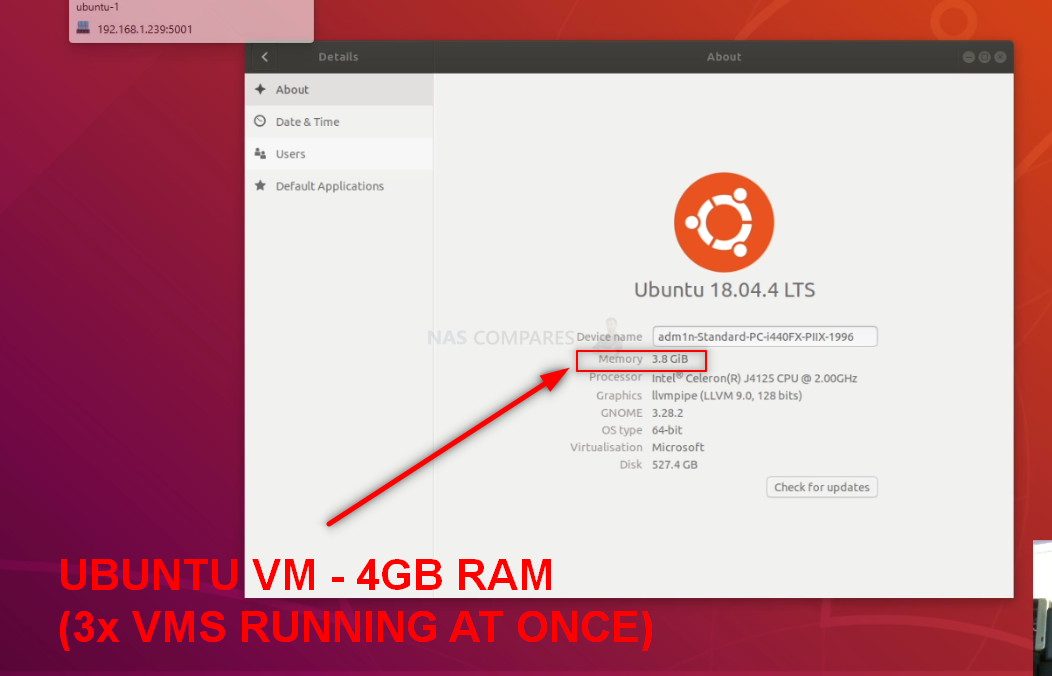
Heading into the system information, once again, the 8GB Memory was recognized as recognised in total available physical memory: Heading into the Virtual Machine Manager and assigned a massive chunk of the available memory to an Ubuntu VM to see if the system would have any issue with assigning it. No barriers or hurdles were raised.
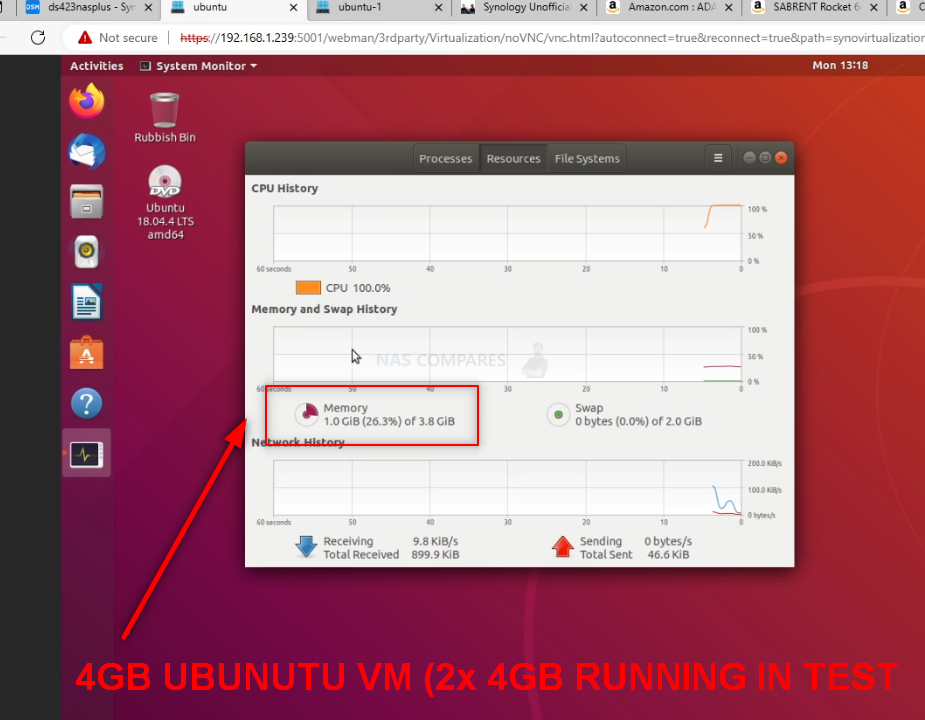
Booting the VM, We were able to head into the Ubuntu System Monitor and see that the memory quantity was successfully allocated to the Virtual Machine:
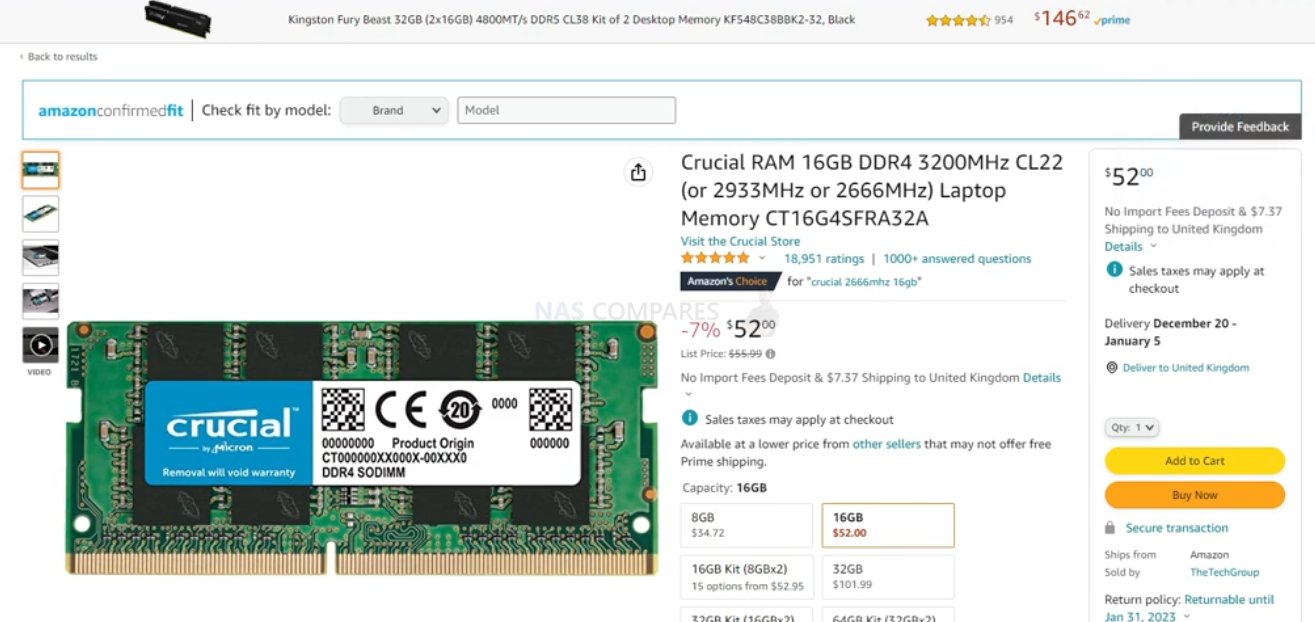
Synology DS423+ NAS + with 1x Crucial 16GB 3200Mhz DDR4 SODIMM
Crucial Memory 2x DDR4 SODIMM CT16G4SFRA32A – (8/16/32GB Available):
After installation, I checked the Synology Resource Monitor and the Crucial memory was recognized:
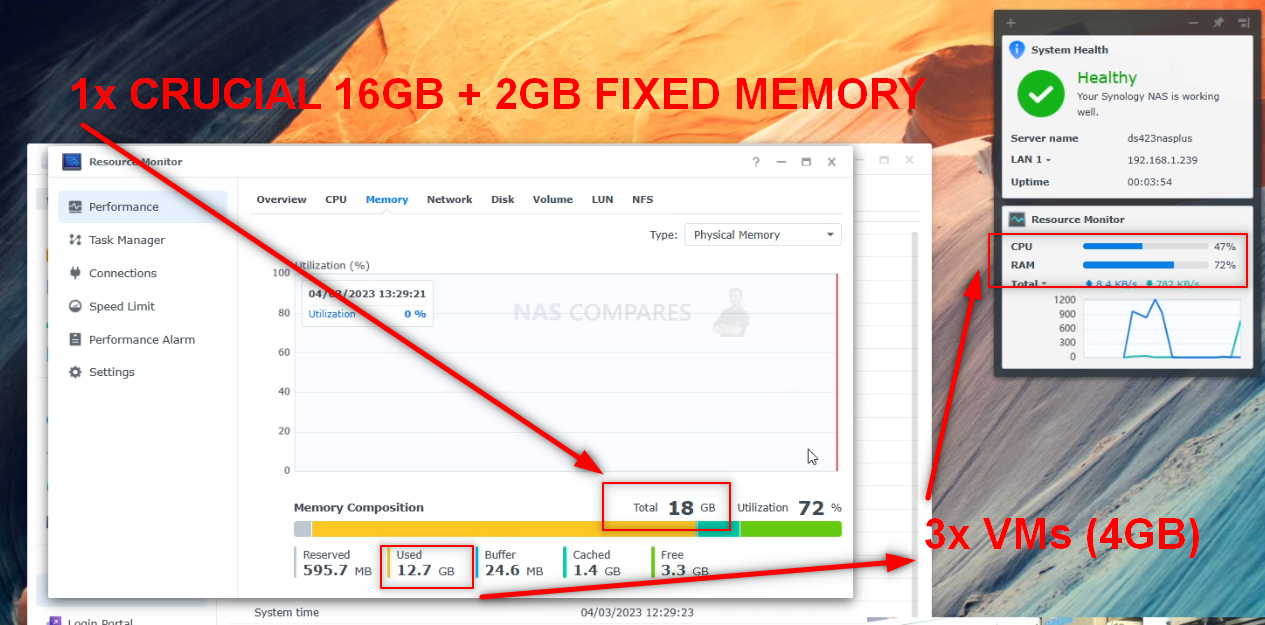
Heading into the system information, once again, the 16GB Memory was recognized as recognised in total available physical memory:
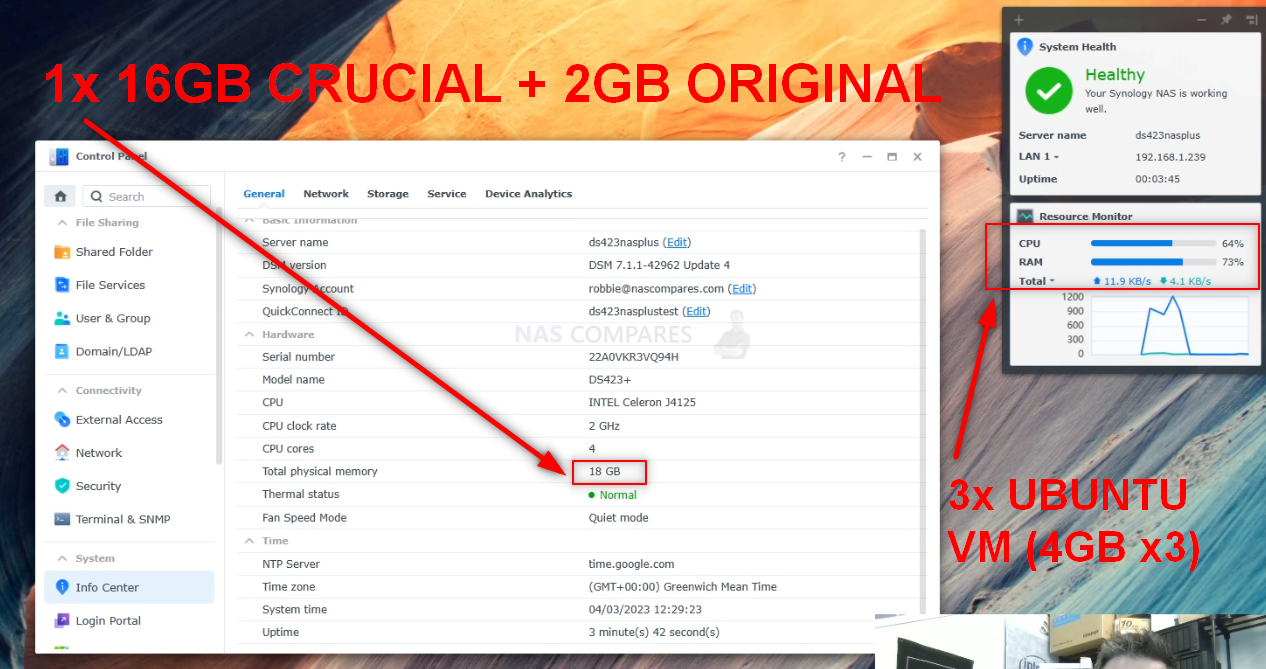
Heading into the Virtual Machine Manager and assigned a massive chunk of the available memory to an Ubuntu VM to see if the system would have any issue with assigning it. No barriers or hurdles were raised.
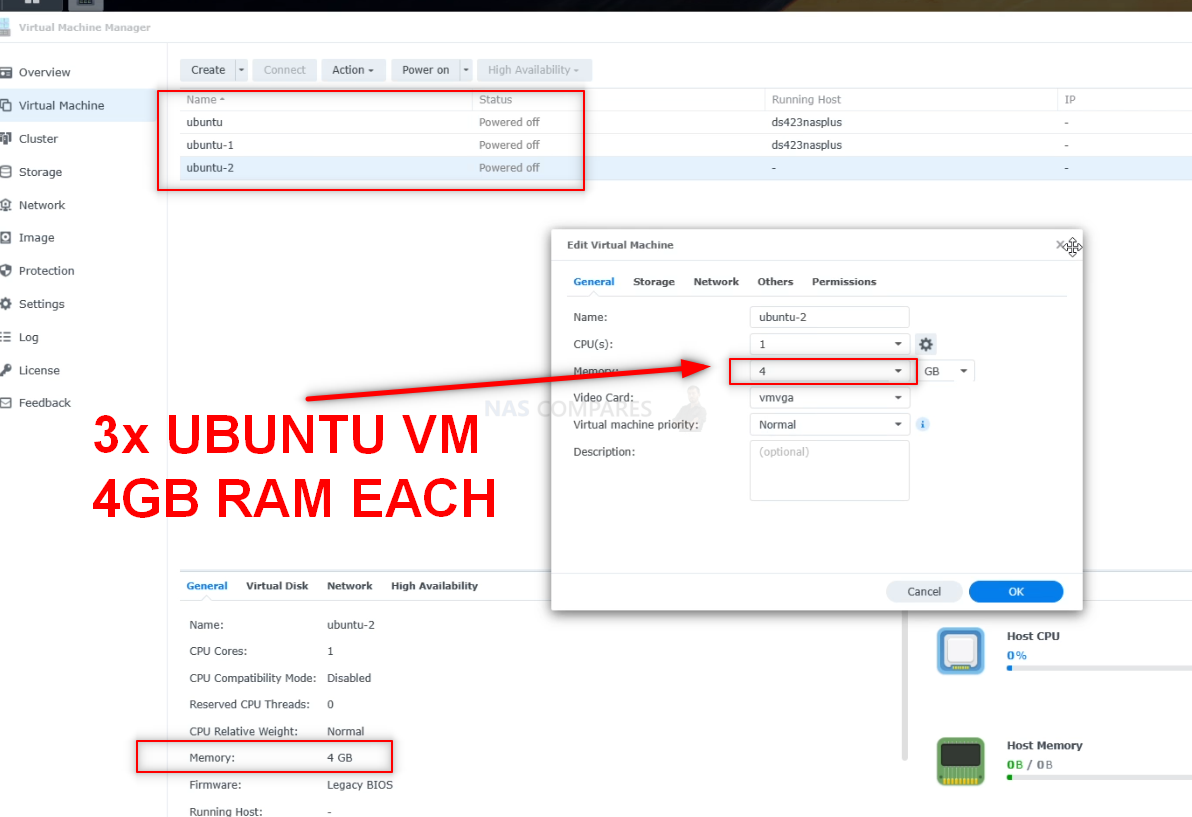
Booting the VM, We were able to head into the Ubuntu System Monitor and see that the memory quantity was successfully allocated to the Virtual Machine:
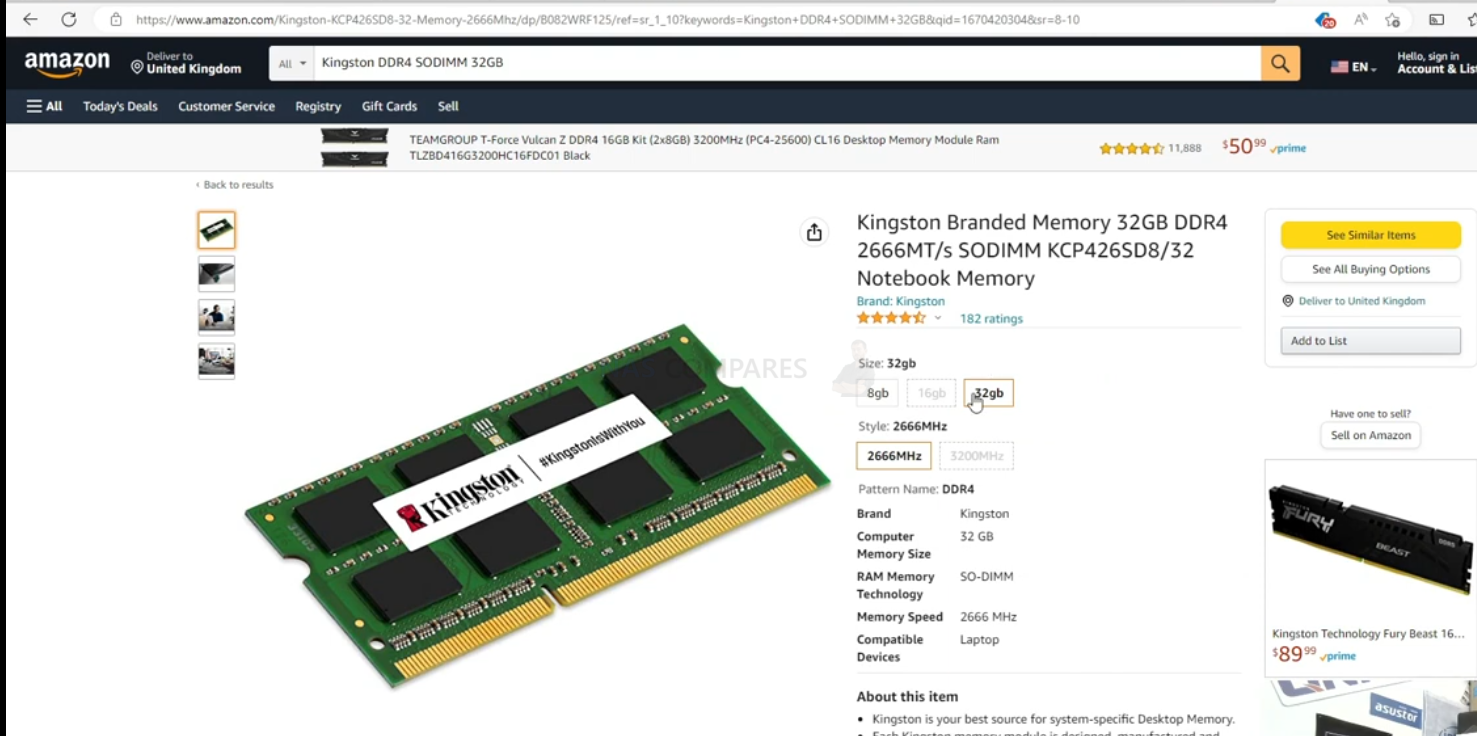
Synology DS423+ NAS + with 1x Kingston 32GB 3200Mhz DDR4 SODIMM
Kingston Memory 2x DDR4 SODIMM KCP432SD8/32 – (8/16GB Available):
After installation, I checked the Synology Resource Monitor and the Kingston memory was recognized:
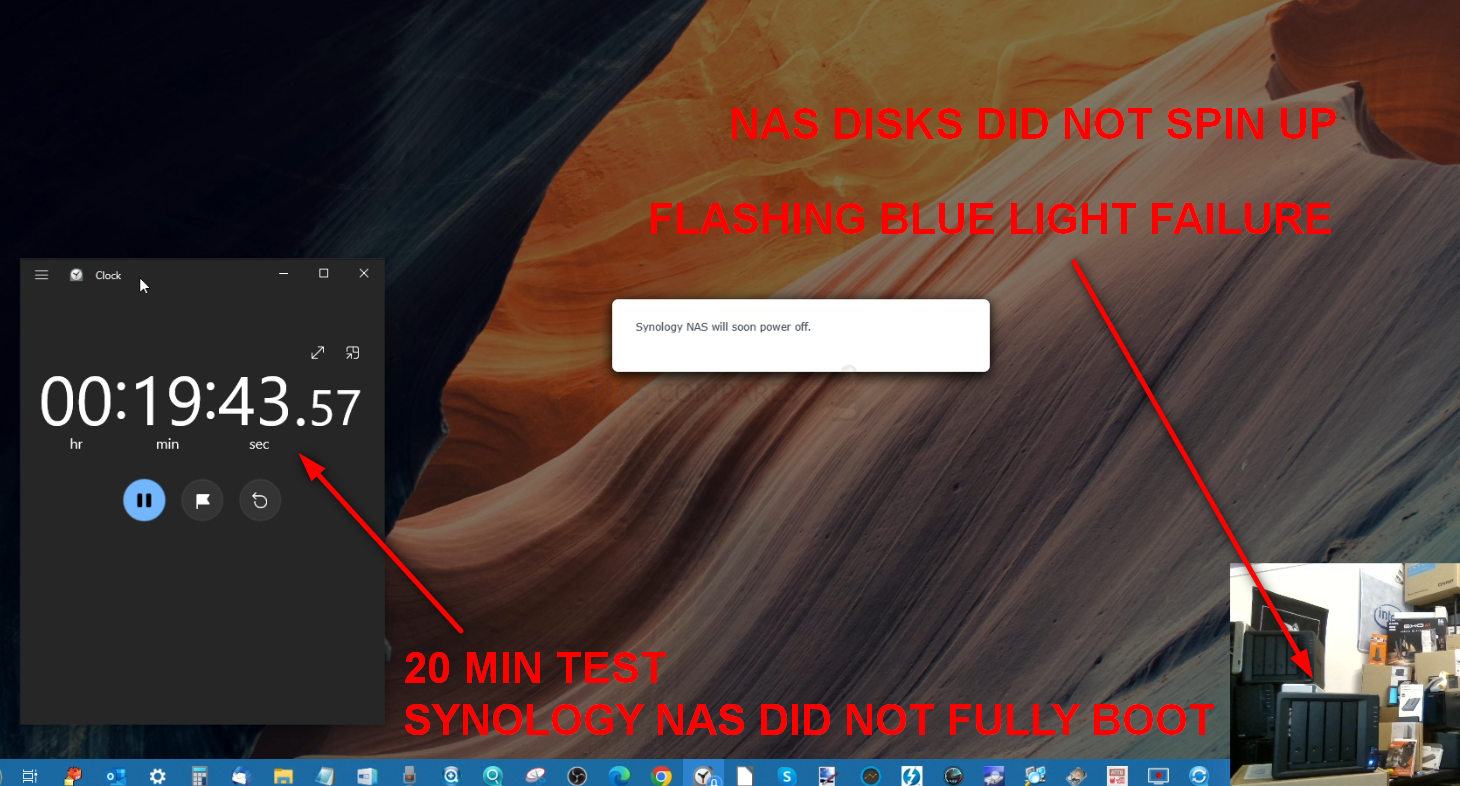
Unfortunately, it became VERY clear that this was just too much for the Synology DS423+ NAS to handle, and the system would not boot, even after 20mins. Now, perhaps if I had given the system more time it might have booted – but it did not feel me with any kind of confidence in the stability of using the 32GB Memory module. There are several reasons why this might not have worked, but most likely was that the individual memory blocks on the 32GB Kingston module (8x 2GB on either side of the PCB) were simply too big for the DS423+ and its CPU to utilize. This is not unrelated to the same reason why you need to opt for dual rank memory modules in the smaller capacities, as if you go for the since-sided 8GB it is 4x 2GB – so the same module size as this 32GB. Overall, the 16GB Module from Crucial and the Internal 2GB were as good as we were going to get in terms of visible memory on the Synology DS423+ NAS.
Synology DS423+ Official/Unofficial Memory Upgrade – Step 4, Checking the Memory is Usable
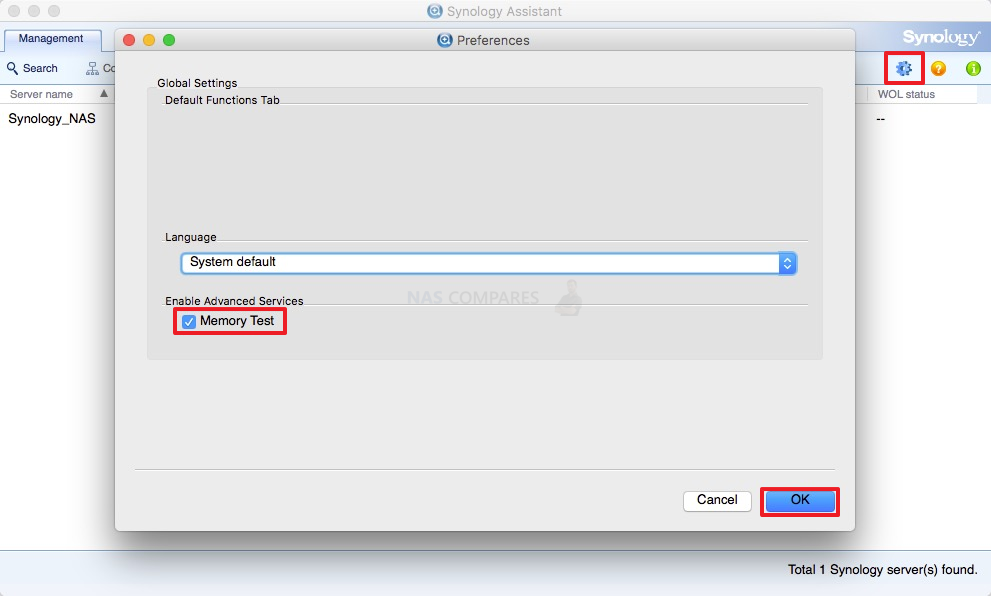
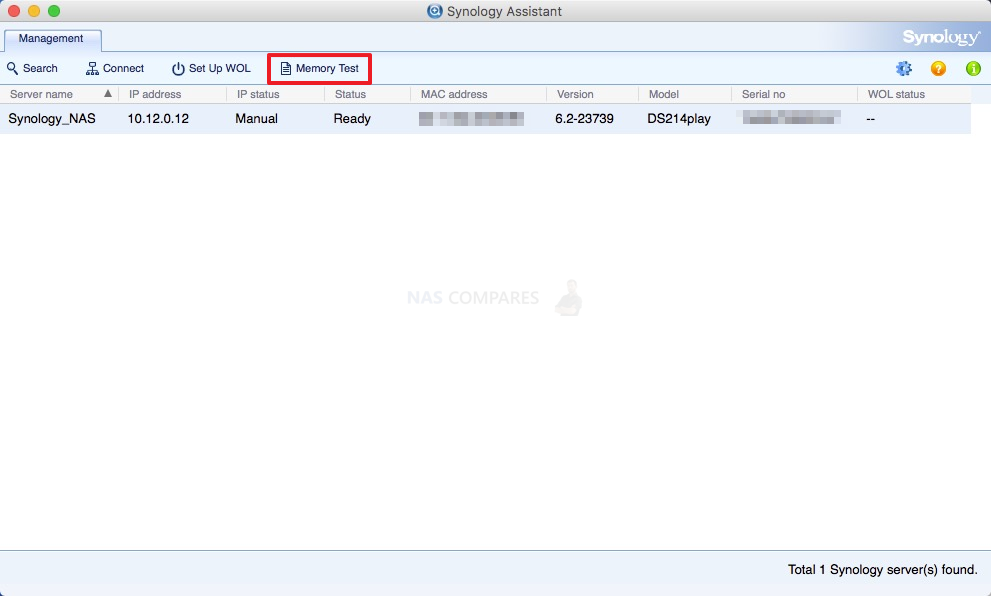
There are several ways to check the memory is working on your Synology DS423+ correctly. One easy method that can be done very quickly is using the Synology Memory Test tool.
To run a memory test:
-
- Download and install the Synology Assistant, where you can find the memory test function. The application is available at Download Center.
- Open Synology Assistant, click and enable the memory test service.

-
- Select the device where you wish to run the test and click Memory Test.

- Select the device where you wish to run the test and click Memory Test.
During the memory test, your Synology NAS will be rebooted. It will recover after another reboot if its memory is normal and passes the test. However, if the memory test fails to finish or shows that there is an error, the memory may be faulty. In this case, you are strongly recommended to return your Synology NAS for repair. Just in case you have installed a non-Synology memory module, please remove it and rerun the memory test. Though once again, you should remember that Synology do not recommend using memory modules that are not from Synology themselves, so this test may not be indicative of the health of unofficial memory in your Synology NAS.

Alternatively, you can perform as many actions and processes as possible (scans, copy/pastes, thumbnail generation, transcode a 4K file, RAID changes, synchronisation, etc) at once to see how the task manager and resource monitor behaves in the Synology DS423+. It should spike each time and at a greater height as you do more and more and once it exceeds the memory you had previously installed, this is a good confirmation that the installation is working fine. Alternatively, you can temporarily allocate chunks of memory and then that is a much more reliable test. Install the virtual machine application for the Synology DS423+ (P.S. for Synology users it is the Virtual Machine Manager and for QNAP it is the Virtualisation station). Then you can create individual VMs (it is alot easier than it sounds and the Synology DS423+ VM software is very user-friendly) then allocate a large number of GBs (Gigabytes) of memory to each one. When you have created 3 or 4 individual virtual machine containers on the Synology DS423+ software, then you can run them all at once and that will immediately use almost all the memory at once! If there are any issues with the memory, it will show here almost immediately. If no problems, then you know the Synology DS423+ unofficial Crucial/Kingston memory installation as successful. You can then delete the VMs in the virtual machine software and then free up all that memory again.
- Link below for Tested RAM modules from Crucial, Kingston, Samsung, Timtec and Synology Official Memory too:
| DS423+ | DDR4-2666 non-ECC unbuffered SO-DIMM 260pin 1.2V | D4NESO-2666-4G
|
Crucial 4GB – Buy Here
TimeTec 4GB – Buy Here Kingston 4GB- Buy Here Crucial 8GB – Buy Here TimeTec 8GB – Buy Here Kingston 8GB- Buy Here Crucial 16GB – Buy Here TimeTec 16GB – Buy Here Kingston 16GB- Buy Here Crucial 32GB – DOES NOT WORK! |
VERY IMPORTANT – The Links used in the article below towards the correct unofficial memory are occasionally changed (beyond my control) as it will direct you to the site in your own region/country. MAKE SURE to check that the memory module (especially 16GB SODIMM modules) are DUAL RANK or ‘DR‘, as Synology NAS typically have trouble with SR/SINGLE RANK modules.
 LET ME KNOW ABOUT NEW POSTS
Subscribe
This description contains links to Amazon. These links will take you to some of the products mentioned in today’s content. As an Amazon Associate, I earn from qualifying purchases. Visit the NASCompares Deal Finder to find the best place to buy this device in your region, based on Service, Support and Reputation – Just Search for your NAS Drive in the Box Below
Need Advice on Data Storage from an Expert?
We want to keep the free advice on NASCompares FREE for as long as we can. Since this service started back in Jan ’18, We have helped hundreds of users every month solve their storage woes, but we can only continue to do this with your support. So please do choose to buy at Amazon US and
Amazon UK
on the articles when buying to provide advert revenue support or to donate/support the site below.

Finally, for free advice about your setup, just leave a message in the comments below here at NASCompares.com and we will get back to you.

Need Help?
Where possible (and where appropriate) please provide as much information about your requirements, as then I can arrange the best answer and solution to your needs. Do not worry about your e-mail address being required, it will NOT be used in a mailing list and will NOT be used in any way other than to respond to your enquiry.
[contact-form-7]
Support What We Do


Alternatively, why not ask me on the ASK NASCompares forum, by clicking the button below. This is a community hub that serves as a place that I can answer your question, chew the fat, share new release information and even get corrections posted. I will always get around to answering ALL queries, but as a one-man operation, I cannot promise speed! So by sharing your query in the ASK NASCompares section below, you can get a better range of solutions and suggestions, alongside my own.